# System architecture
**Overview**
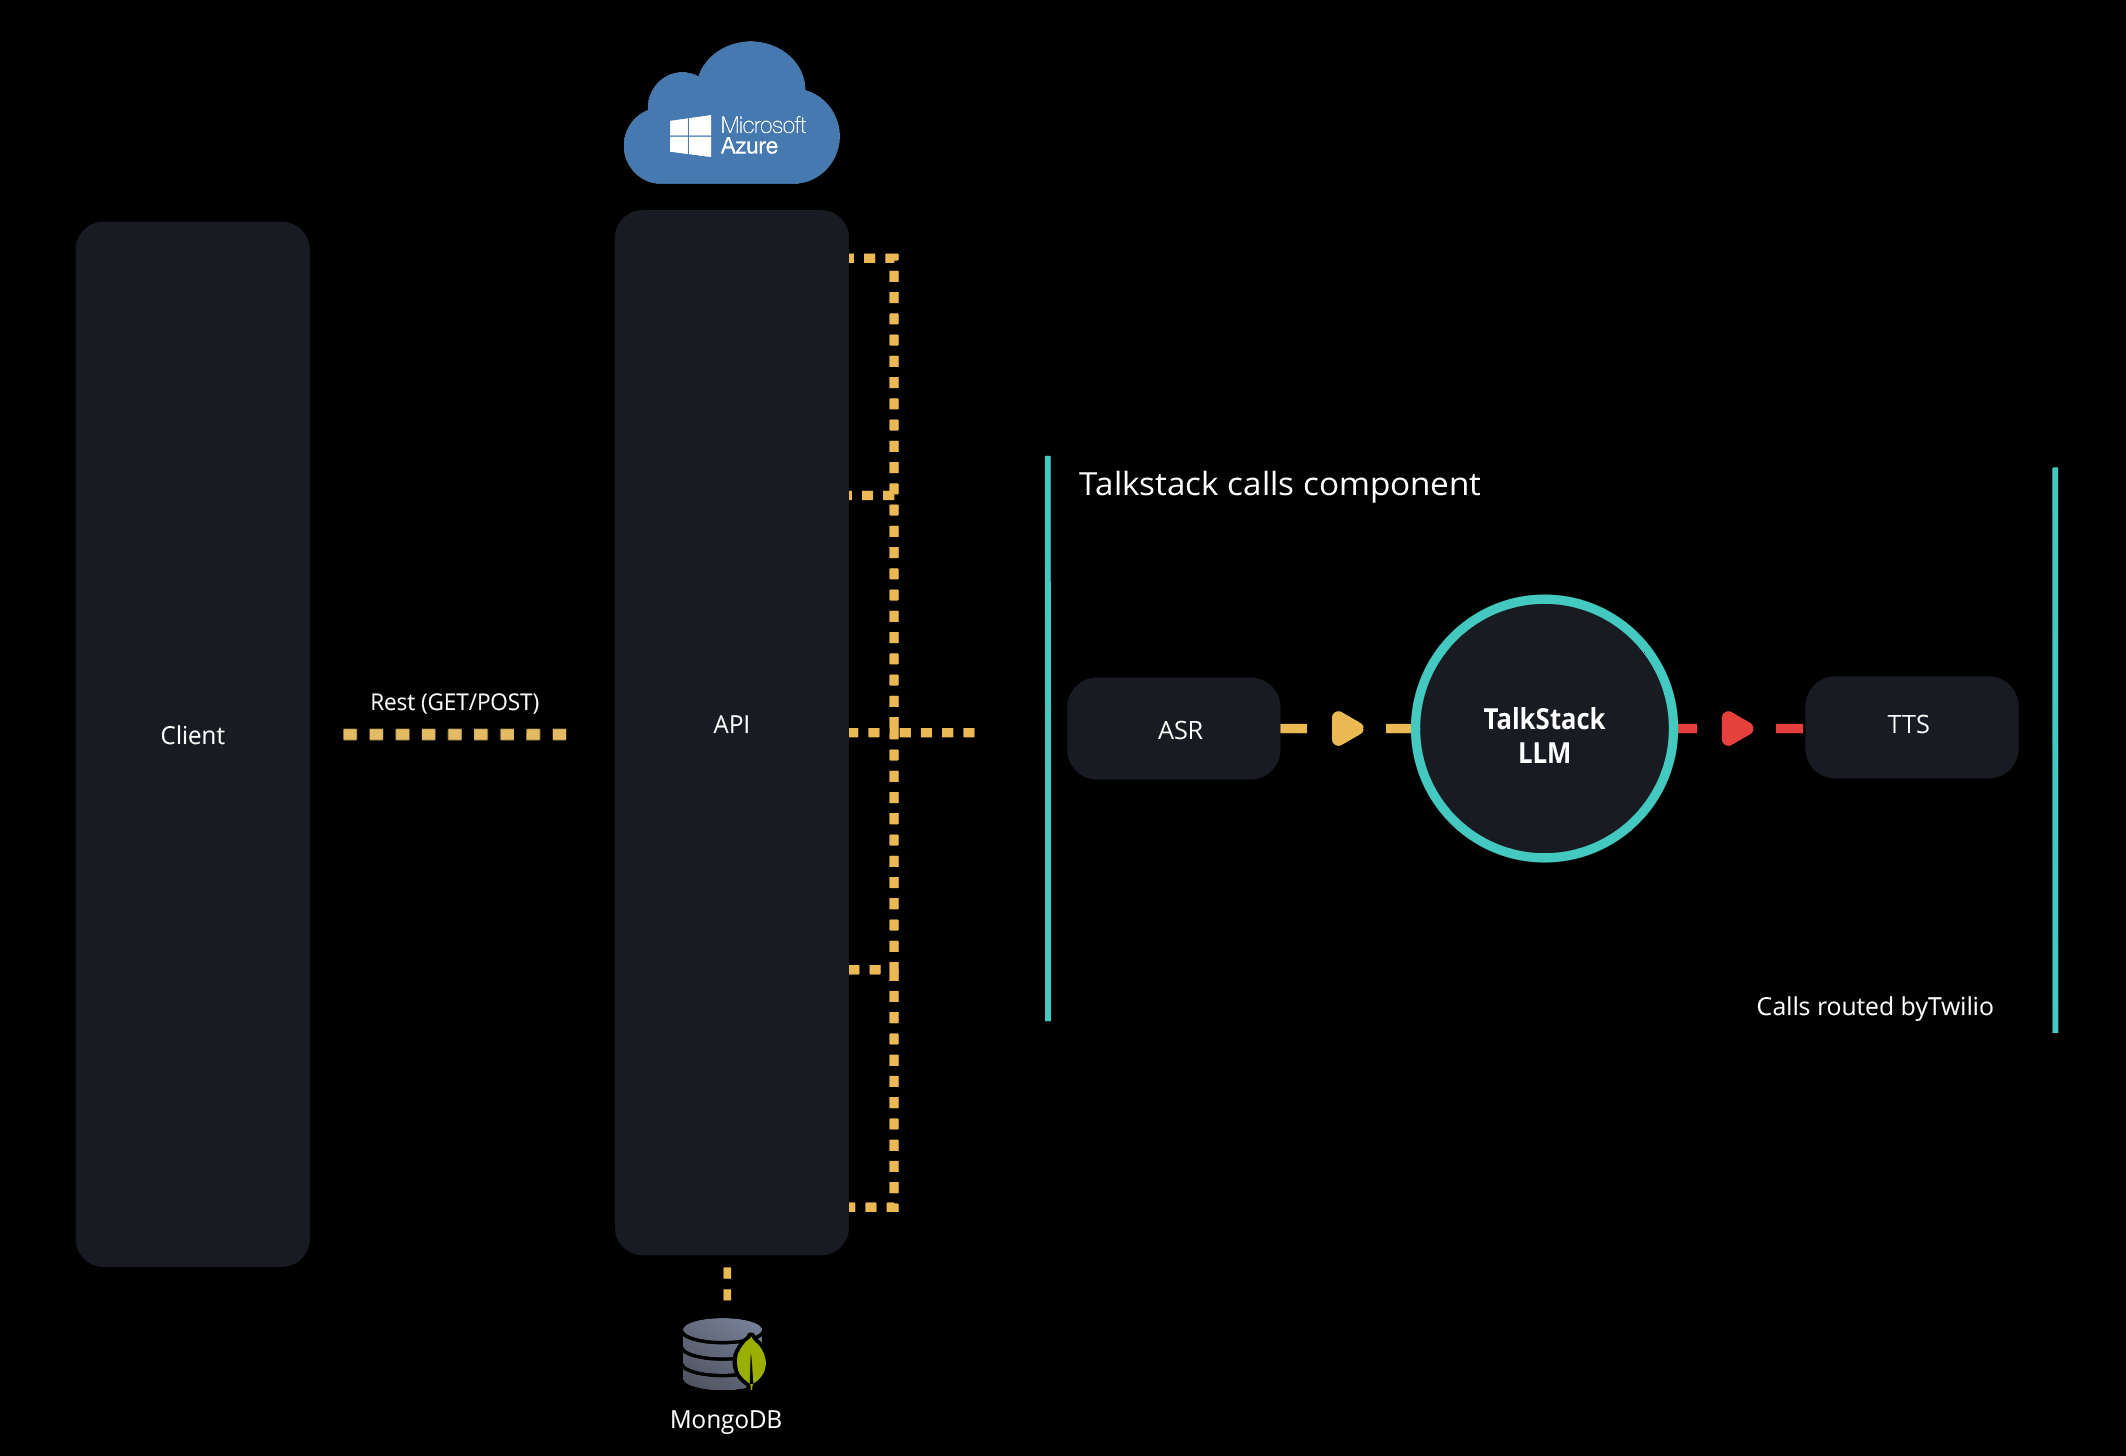
Our architecture is designed to provide seamless integration and efficient processing of client requests through our Talkstack AI system. Below is a detailed overview of the components involved and the workflow.
**Workflow Description**
1. **Client Requests**: Clients interact with our system by sending RESTful API requests (GET/POST/PUT/DELETE) to our endpoints. These APIs are hosted on Microsoft Azure, ensuring high availability and reliability. While we typically host our API and MongoDB in the US, we have the flexibility to deploy in locations preferred by our customers.
2. **API Processing**: Upon receiving the client requests, our API layer processes the requests. This layer interfaces with a MongoDB instance for any necessary data storage and retrieval.
3. **Speech Processing**:
* **Automatic Speech Recognition (ASR)**: The initial step in the call handling process is ASR, where the client's spoken input is converted into text.
* **Talkstack LLM**: The text output from the ASR is then processed by our Talkstack Large Language Model (LLM). This AI component generates appropriate responses based on the input.
* **Text-to-Speech (TTS)**: The generated text response is then converted back into speech using TTS technology, providing a vocal response to the client.
4. **Call Routing**: The entire process of ASR to TTS is part of the Talkstack calls component, with calls routed efficiently by Twilio to ensure smooth communication.
This architecture ensures that our system can handle client interactions effectively, providing accurate and timely responses using advanced AI and cloud technologies.
Architecture diagram
# Getting Started With Talkstack's API
If you need support, reach out to us at [pasquale@talkstack.ai](mail:pasquale@talkstack.ai).
To start, you will need a Project ID and Agent ID that will be provided by Talkstack.
TalkStack provides AI-powered voice assistant capabilities that can be utilized to make automated calls and retrieve call statuses and analysis. This documentation will guide you on how to use the `makeCall` and `getCallStatus` endpoints effectively.
The API endpoints are located at: [ ](< https://microservice-template-732977783289.us-central1.run.app >).
# Signup
This section provides instructions on using /auth/signup endpoint to use for user signup.
**Step 1: Prepare Your Request**
* **Endpoint:** `/auth/signup`
* **Method:** `POST`
* **URL:** `https://api.talkstackai.com/auth/signup`
* **Headers:** Include `Content-Type: application/json`.
**Step 2:** **Create the Request Body**
* `email`: Email of the user.
* `password` : Password for the account.
* `name` : Name of the user to be registered.
**Example Request Body:**
```
{
"email": "example@host.com",
"password": "XXXXXXXXXX",
"name": "John"
}
```
**Step 3: Send the Request**
Use your preferred HTTP client to send the POST request with the JSON body.
**Step 4: Handle the response**
**Success Response:**
* **Status Code:** `200 OK`
* `token`: The token to be used for authorization. The token is only valid for 2 hours.
* `refreshToken`: Token to be used to get new token and continue session.
* `expirationTime`: Time after which the token will expire.
* `signupStatus`: The signup statuses are based on this enum:
```javascript
export const SIGNUP_STATUS = {
'CREDENTIALS_MISSING': 0,
'ACCOUNT_ALREADY_EXISTS': 1,
'EMAIL_NOT_VERIFIED': 2,
'SUCCESS': 3,
'SIGNUP_FAILED': 4,
'INVALID_EMAIL': 5,
'EMAIL_NOT_SENT': 6
}
```
* **Response Body**
```
{
"message": "User registered successfully",
"status": "success",
"user": {
"email": "example@host.com",
"name": "Johm",
"active_project": null,
"created_at": "2025-03-10T05:20:39.831Z",
"updated_at": "2025-03-10T05:20:39.831Z",
"company_name": null
},
"signupStatus": 3
}
```
**Troubleshooting**
* `400 Bad Request`: If the `email` or `password` or `name` is missing in the request or if the email is not in a valid format or if it already exists.
* `500 Internal Server Error`: For errors in signup.
Last updated 17 hours ago
# Verify Email
This section provides instructions on using /auth/verify-email endpoint to use for verifying user after signup.
**Step 1: Prepare Your Request**
* **Endpoint:** `/auth/verify-email`
* **Method:** `POST`
* **URL:** `https://api.talkstackai.com/auth/verify-email`
* **Headers:** Include `Content-Type: application/json`.
**Step 2:** **Create the Request Body**
* `email`: Email of the user.
* `code` : The code sent to the email entered.
**Example Request Body:**
```
{
"email": "example@host.com",
"code": "xxxxxx"
}
```
**Step 3: Send the Request**
Use your preferred HTTP client to send the POST request with the JSON body.
**Step 4: Handle the response**
**Success Response:**
* **Status Code:** `200 OK`
* `userData`: It is the data about the user.
* `verificationStatus`: The verification statuses are based on this enum:
```javascript
export const EMAIL_VERIFICATION_STATUS = {
'CREDENTIALS_MISSING': 0,
'INVALID_CODE': 1,
'SUCCESS': 2,
'RESEND_INVITE': 3,
'ACCOUNT_EXISTS': 4,
'ACCOUNT_NOT_FOUND': 5
}
```
**Response Body**
```json
{
"message": "email verification successful.",
"status": "success",
"userData": {
"email": "example@host.com",
"name": "John",
"active_project": null,
"created_at": "2025-03-11T06:50:31.798Z",
"updated_at": "2025-03-11T06:52:07.501Z"
},
"verificationStatus": 2
}
```
**Troubleshooting**
* `400 Bad Request`: Bad request is only thrown if one of the scenarios occur:\
\- `email` or `code` missing in request body.\
\- `email` is invalid.\
\- A verified account already exists with this email.
* `404 Not Found`: Is the email has not been registered for verification.
* `500 Internal Server Error`: For errors in email verification.
Last updated 17 hours ago
# Resend email verification code
This section provides instructions on using /auth/resend-code endpoint to get verification code resent to the provided email.
**Step 1: Prepare Your Request**
* **Endpoint:** `/auth/resend-code`
* **Method:** `POST`
* **URL:** `https://api.talkstackai.com/auth/resend-code`
* **Headers:** Include `Content-Type: application/json`.
**Step 2:** **Create the Request Body**
* `email`: Email of the user.
**Example Request Body:**
```json
{
"email": "example@host.com"
}
```
**Step 3: Send the Request**
Use your preferred HTTP client to send the POST request with the JSON body.
**Step 4: Handle the response**
**Success Response:**
* **Status Code:** `200 OK`
```
{
"message": "successfully sent verification code to mail",
"status": "success"
}
```
**Troubleshooting**
* `400 Bad Request`: `email` is missing in request body or invalid.
* `404 Not Found`: Is the email has not been registered for verification.
* `500 Internal Server Error`: For server errors.
Last updated 17 hours ago
# Login
This section provides instructions on using /auth/login endpoint to use for user login.
j**Step 1: Prepare Your Request**
* **Endpoint:** `/auth/login`
* **Method:** `POST`
* **URL:** `https://api.talkstackai.com/auth/login`
* **Headers:** Include `Content-Type: application/json`.
**Step 2:** **Create the Request Body**
* `email`: Registered email of the user.
* `password` : Password of the account.
**Example Request Body:**
```
{
"email": "example@host.com",
"password": "XXXXXXXXXX"
}
```
**Step 3: Send the Request**
Use your preferred HTTP client to send the POST request with the JSON body.
**Step 4: Handle the response**
**Success Response:**
**Status Code:** `200 OK`
* token: The token to be used for authorization. The token is only valid for 2 hours.
* refreshToken: Token to be used to get new token and continue session.
* expirationTime: Time after which the token will expire.
* `loginStatus`: The login statuses are based on this enum:
```javascript
export const LOGIN_STATUS = {
'CREDENTIALS_MISSING': 0,
'ACCOUNT_ALREADY_EXISTS': 1,
'ACCOUNT_NOT_VERIFIED': 2,
'USER_NOT_FOUND': 3,
'INVALID_PASSWORD': 4,
'HUBSPOT_INTEGRATION_FAILED': 5,
'HUBSPOT_INTEGRATION_SUCCESS': 6,
'SUCCESS': 7,
'LOGIN_FAILED': 8,
'INVALID_EMAIL': 9
}
```
* **Response Body**
```json
{
"message": "successfully logged in.",
"status": "success",
"token": "xxxxxxxxxxxxxxxxxxx",
"refreshToken": "xxxxxxxxxxxxxxxxxx",
"expirationTime": "2025-03-11T17:49:38.925Z",
"user": {
"email": "example@host.com",
"name": "John",
"active_project": null,
"created_at": "2025-03-05T11:04:49.875Z",
"updated_at": "2025-03-05T11:06:02.837Z",
"company_name": null
},
"loginStatus": 7
}
```
**Troubleshooting**
* `400 Bad Request`: If the `email` or `password` is missing in the request.
* `401 Not Found`: If the password is invalid.
* `404 Not Found`: If the user is not found.
* `500 Internal Server Error`: For errors in login.
Last updated 18 hours ago
# Refresh Token
This section provides instructions on using /auth/refresh-token endpoint to use for user login.
**Step 1: Prepare Your Request**
* **Endpoint:** `/auth/refresh-token`
* **Method:** `POST`
* **URL:** `https://api.talkstackai.com/auth/refresh-token`
* **Headers:** Include `Content-Type: application/json`.
**Step 2:** **Create the Request Body**
* `refreshToken`: refresh token sent after login.
**Example Request Body:**
```json
{
"refreshToken": "xxxxxxxxxxxxxxxxxxxxxxxxxxxxxxxxxx"
}
```
**Step 3: Send the Request**
Use your preferred HTTP client to send the POST request with the JSON body.
**Step 4: Handle the response**
**Success Response:**
**Status Code:** `200 OK`
* token: The token to be used for authorization. The token is only valid for 2 hours.
* refreshToken: Token to be used to get new token and continue session.
* expirationTime: Time after which the token will expire.
```
{
"token": "example@host.com",
"resfreshToken": "XXXXXXXXXX",
"expirationTime": "2025-01-13T10:24:48.229Z"
}
```
**Troubleshooting**
* `400 Bad Request`: If the `resfreshToken` is missing in the request.
* `401 Not Found`: If the `resfreshToken` is invalid or expired.
* `404 Not Found`: If the user is not found.
* `500 Internal Server Error`: For errors in getting new token.
Last updated 18 hours ago
# Change Password
This section provides instructions on using /auth/change-password endpoint to recover your account. This API is used to change password of the account.
**Step 1: Prepare Your Request**
* **Endpoint:** `/auth/change-password`
* **Method:** `POST`
* **URL:** `https://api.talkstackai.com/auth/change-password`
* **Headers:** Include `Content-Type: application/json`.
* **Authorization:** Bearer token or x-api-key in Headers
**Step 2:** **Create the Request Body**
**Example Request Body:**
```json
{
"oldPassword": "Old@1234",
"newPassword": "New@123"
}
```
**Step 3: Send the Request**
Use your preferred HTTP client to send the POST request with the JSON body.
**Step 4: Handle the response**
**Success Response:**
**Status Code:** `200 OK`
```json
{
"message": "successfully updated password.",
"status": "success"
}
```
**Troubleshooting**
* `400 Bad Request`: If the `oldPassword` or `newPassword` is missing.
* `401 Unauthorized`: If the `oldPassword` entered doesn't match with the one stored in DB.
* `500 Internal Server Error`: For errors in forgot password API.
Last updated 18 hours ago
# Forgot Password
This section provides instructions on using /auth/forgot-password endpoint to recover your account.
**Step 1: Prepare Your Request**
* **Endpoint:** `/auth/forgot-password`
* **Method:** `POST`
* **URL:** `https://api.talkstackai.com/auth/forgot-password`
* **Headers:** Include `Content-Type: application/json`.
**Step 2:** **Create the Request Body**
* `email`: Registered email of the user.
**Example Request Body:**
```
{
"email": "example@host.com"
}
```
**Step 3: Send the Request**
Use your preferred HTTP client to send the POST request with the JSON body.
**Step 4: Handle the response**
**Success Response:**
**Status Code:** `200 OK`
**Body:**
```json
{
"message": "If the email is registered, a reset link has been sent.",
"status": "success"
}
```
**Troubleshooting**
* `400 Bad Request`: If the `email` is missing or invalid or if you haven't registered using this email.
* `404 Not Found`: If the user is not found.
* `500 Internal Server Error`: For errors in forgot password API.
Last updated 18 hours ago
# Reset Password
This section provides instructions on using /auth/reset-password endpoint to reset account password. Reset password API is to be called after the forgot password API is hit.
**Step 1: Prepare Your Request**
* **Endpoint:** `/auth/reset-password`
* **Method:** `POST`
* **URL:** `https://api.talkstackai.com/auth/reset-password`
* **Headers:** Include `Content-Type: application/json`.
**Step 2:** **Create the Request Body**
* `email`: Registered email of the user.
**Example Request Body:**
```json
{
"token": "xxxxxxxxxxxxxxxx",
"newPassword": "abc@123"
}
```
**Step 3: Send the Request**
Use your preferred HTTP client to send the POST request with the JSON body.
**Step 4: Handle the response**
**Success Response:**
**Status Code:** `200 OK`
```json
{
"message": "Password has been reset successfully.",
"status": "success"
}
```
**Troubleshooting**
* `400 Bad Request`: If the `token` is expired or invalid.
* `500 Internal Server Error`: For errors in forgot password API.
Last updated 18 hours ago
# Generate API key
This section provides instructions on using `/user/generate-apikey` endpoint to generarte new API key.
**Step 1: Prepare Your Request**
* **Endpoint:** `/user/generate-apikey`
* **Method:** `GET`
* **URL:** `https://api.talkstackai.com/user/generate-apikey`
* **Headers:** Include `Content-Type: application/json`.
* **Authorization:** Bearer token
**Step 2: Send the Request**
Use your preferred HTTP client to send the GET request.
**Step 3: Handle the request**
**Success Response:**
* **Status Code:** `200 OK`
* **Body:**
* ```json
{
"message": "API key successfully generated and updated.",
"status": "success",
"apiKey": "54447c25f46cf13f54915e4465bd443b4a0b98c5623cfc68e1393223984bf96c"
}
```
**Troubleshooting**
* `401 Unauthorized`: If the user is unauthorized.
* `500 Internal Server Error`: For errors in creating API key.
# Set active Project
**Step1: Prepare Your Request**
* **Endpoint:** `/user/set-active-project`
* **Method:** `POST`
* **URL:** `https://api.talkstackai.com/user/set-active-project`
* **Headers:** Include `Content-Type: application/json`.
* **Authorization:** Bearer token or x-api-key in Headers
**Step2: Create the Request Body**
* `projectId`: Id of the project you want to set as active project.
```
{
"projectId": "xxxxxxxxxxxxxxxxxxxxx"
}
```
**Step 3: Send the Request**
Use your preferred HTTP client to send the POST request with the JSON body.
**Step 4: Handle the request**
The response will provide detailed information about the project set and the user for whom the project is set.
**Success Response:**
* **Status Code:** `200 OK`
* **Body:**
```json
{
"message": "successfully set project with id dce09491-e3c8-4c0b-bf01-c8ef8729088b active.",
"status": "success",
"userData": {
"id": "xxxxxxxxxxxxxxxxxxxxxxxxxxx",
"name": "user name",
"email": "example@gmail.com",
"verified": true,
"created_at": "2025-02-19T04:57:24.000Z",
"updated_at": "2025-02-19T04:57:31.000Z",
"active_project": "xxxxxxxxxxxxxxxxxxxxxxxx"
},
"projectData": {
"name": "Project Name",
"user_id": "xxxxxxxxxxxxxxxxxxxxxxxxx",
"status": "ACTIVE",
"description": "Project Description",
"call_status_webhook": "htttps://example.com",
"id": "xxxxxxxxxxxxxxxxxxxxxxxxxxxx"
}
}
```
**Troubleshooting**
* `400 Bad Request`: If the `projectId` is not provided in the request body or if the project does not exist.
* `401 Unauthorized`: If the user is unauthorized or the token is missing.
* `500 Internal Server Error`: For errors in setting active project.
# Get active Project
**Step1: Prepare Your Request**
* **Endpoint:** `/user/get-active-project`
* **Method:** `GET`
* **URL:** `https://api.talkstackai.com/user/get-active-project`
* **Headers:** Include `Content-Type: application/json`.
* **Authorization:** Bearer token or x-api-key in Headers
**Step 2: Send the Request**
Use your preferred HTTP client to send the GET request.
**Step 3: Handle the request**
The response will provide detailed information about the active project.
**Success Response:**
* **Status Code:** `200 OK`
* **Body:**
```json
{
"message": "fetched active project data.",
"status": "success",
"projectData": {
"name": "Project name",
"user_id": "xxxxxxxxxxxxxxxxxxxxxxx",
"status": "ACTIVE",
"description": "Project Description",
"call_status_webhook": "https://example.com",
"id": "xxxxxxxxxxxxxxxxx"
}
}
```
**Troubleshooting**
* `404 Bad Request`: If no active project is set.
* `401 Unauthorized`: If the user is unauthorized or the token is missing.
* `500 Internal Server Error`: For errors in getting active project.
# Creating a new project
This section provides instructions on using the /project/create-project endpoint to create a new project. Each project under a user should have a unique name.
**Step1: Prepare Your Request**
* **Endpoint:** `/project/create-project`
* **Method:** `POST`
* **URL:** `https://api.talkstackai.com/project/create-project`
* **Headers:** Include `Content-Type: application/json`.
* **Authorization:** Bearer token or x-api-key in Headers
**Step2: Create the Request Body**
* `name`: Name of the project.
* `description`: Description of the project.
```
{
"name": "Demo Project",
"description": "This is a demo project."
}
```
**Step 3: Send the Request**
Use your preferred HTTP client to send the POST request with the JSON body.
**Step 4: Handle the response**
The response will provide detailed information about the new project created.
**Success Response:**
* **Status Code:** `200 OK`
* **Body:**
```json
{
"message": "successfully created project.",
"status": "success",
"data": {
"name": "John Smith Clinic",
"user_id": "xxxxxxxxxxxxxxxxxxxxxxxxxxxxxxxx",
"status": "ACTIVE",
"description": "",
"call_status_webhook": null,
"id": "xxxxxxxxxxxxxxxxxxxxxxxxxx",
"active_agent": null,
"created_at": null,
"updated_at": null
}
}
```
**Troubleshooting**
* `400 Bad Request`: If the `name`, or `description` is not there or if the project with same name already exists.
* `401 Unauthorized`: If the user is unauthorized or the token is missing.
* `500 Internal Server Error`: For errors in creating a new project.
Last updated 13 hours ago
# Get Project
This section provides instructions to use /project/:projectId endpoint to get the list of projects of a user.
**Step1: Prepare Your Request**
* **Endpoint:** `/project/:projectId`
* **Method:** `GET`
* **URL:** `https://api.talkstackai.com/project/:projectId`
* **Headers:** Include `Content-Type: application/json`.
* **Authorization:** Bearer token or x-api-key in Headers
**Step 2: Send the Request**
Use your preferred HTTP client to send the GET request.
**Step 3: Handle the request**
The response will provide a detailed list of projects created by logged in user.
**Success Response:**
* **Status Code:** `200 OK`
* **Body:**
```json
{
"message": "successfully fetched project data.",
"status": "succcess",
"data": {
"name": "John Smith Clinic",
"user_id": "xxxxxxxxxxxxxxxxxxxxxxxxxx",
"status": "ACTIVE",
"description": "",
"is_deleted": false,
"call_status_webhook": null,
"id": "xxxxxxxxxxxxxxxxxxxxxxxxx",
"active_agent": null,
"created_at": null,
"updated_at": null
}
}
```
**Troubleshooting**
* `401 Unauthorized`: If the user is unauthorized or the token is missing.
* `400 Bad Request`: If the project does not exist.
* `500 Internal Server Error`: For errors in getting project data.
# Getting list of projects
This section provides instructions to use /project/list endpoint to get the list of projects of a user.
**Step1: Prepare Your Request**
* **Endpoint:** `/project/list`
* **Method:** `GET`
* **URL:** `https://api.talkstackai.com/project/list`
* **Headers:** Include `Content-Type: application/json`.
* **Authorization:** Bearer token or x-api-key in Headers
**Step 2: Send the Request**
Use your preferred HTTP client to send the GET request.
**Step 3: Handle the request**
The response will provide a detailed list of projects created by logged in user.
**Success Response:**
* **Status Code:** `200 OK`
* **Body:**
```
{
"message": "successfully fetched projects.",
"projects": [
{
"name": "My First Project",
"description": "Project description",
"id": "XXXXXXXXXXXXXXXXXXX",
"status": "ACTIVE",
"call_status_webhook": null
},
{
"name": "Demo Project",
"description": "Project description",
"id": "XXXXXXXXXXXXXXXXXXXXX",
"status": "ACTIVE",
"call_status_webhook": "xxxxxxxxxxxxxxxxxxxxxxxxxxxxxxxxxxx"
}
]
}
```
**Troubleshooting**
* `401 Unauthorized`: If the user is unauthorized or the token is missing.
* `404 Not Found`: If no projects are associated with the user.
* `500 Internal Server Error`: For errors in getting project list.
Last updated 15 hours ago
# Update a project
This section provides instructions for using the /project/:projectId endpoint to create a new agent.
**Step1: Prepare Your Request**
* **Endpoint:** `/project/:projectId`
* **Method:** `PUT`
* **URL:** `https://api.talkstackai.com/project/:projectId`
* **Headers:** Include `Content-Type: application/json`.
* **Authorization:** Bearer token or x-api-key in Headers
**Step2: Create the Request Body**
* `name`: new name of the project.
* `description`: new description of the project.
```
{
"name": "Demo Project",
"description": "This is a project.",
"webhookUrl": "xxxxxxxxxxxxxxxxxxxxxx"
}
```
**Step 3: Request params**
* `projectId` : The id of the project you want to update
**Step 3: Send the Request**
Use your preferred HTTP client to send the PUT request with the JSON body.
**Step 4: Handle the response**
The response will provide detailed information about the updated project.
**Success Response:**
* **Status Code:** `200 OK`
* **Body:**
```json
{
"message": "successfully updated project info.",
"status": "success",
"data": {
"name": "John Smith Clinic",
"user_id": "xxxxxxxxxxxxxxxxxxxxxxxx",
"status": "ACTIVE",
"description": "This is a test project.",
"is_deleted": false,
"call_status_webhook": null,
"created_at": "2025-03-13T01:57:29.186Z",
"updated_at": "2025-03-13T01:57:29.186Z",
"id": "xxxxxxxxxxxxxxxxxxxxxxxxxxxxxx",
"active_agent": null
}
}
```
**Troubleshooting**
* `400 Bad Request`: If both `name` and `description` are not missing or if `projectId` is missing.
* `401 Unauthorized`: If the user is unauthorized or the token is missing.
* `404 Not found`: If the project with the given projectId is not found.
* `500 Internal Server Error`: For errors in updating the project.
Last updated 14 hours ago
# Delete Project
This section provides instructions to use the /project/:projectId endpoint to delete an existing project. A project will be deleted if all the agents are removed from it.
**Step1: Prepare Your Request**
* **Endpoint:** `/project/:projectId`
* **Method:** `DELETE`
* **URL:** `https://api.talkstackai.com/project/:projectId`
* **Headers:** Include `Content-Type: application/json`.
* **Authorization:** Bearer token or x-api-key in Headers
**Step 2: Request Parameters**
* `projectId`: The id of the project that needs to be deleted.
**Step 3: Request Body(optional)**
* `cascade`: This parameter takes a Boolean value. By default its value is false. If you want to delete the project and all agents and phone numbers attached to it, pass cascade as true. If cascade is not sent or false then you will have to remove all agents and phone numbers from the project.
```json
{
"cascade": true
}
```
**Step 3: Send the Request**
Use your preferred HTTP client to send the DELETE request.
**Step 4: Handle the request**
**Success Response:**
* **Status Code:** `200 OK`
* **Body:**
```
{
"message": "successfully deleted project.",
"status": "success"
}
```
**Troubleshooting**
* `400 Bad Request`: If both `projectId` is not defined.
* `401 Unauthorized`: If the user is unauthorized or the token is missing.
* `404 Not found`: If the project with the given projectId is not found.
* `500 Internal Server Error`: For errors in deleting the project.
Last updated 14 hours ago
# Webhook
This section provides instructions on using the /project/create-project endpoint to create a new project. Each project under a user should have a unique name.
**Step1: Prepare Your Request**
* **Endpoint:** `/project/call-status/add-webhookurl`
* **Method:** `POST`
* **URL:** `https://api.talkstackai.com/project/call-status/add-webhookurl`
* **Headers:** Include `Content-Type: application/json`.
* **Authorization:** Bearer token or x-api-key in Headers
**Step2: Create the Request Body**
* `projectId`: Id of the project.
* `webhookURL`: URL of the endpoint where you want to receive call updates.
```
{
"projectId": "xxxxxxxxxxxxxxxxxxxxxxxxxxxxxxxxx",
"webhookURL": "This is a demo project."
}
```
**Step 3: Send the Request**
Use your preferred HTTP client to send the POST request with the JSON body.
**Step 4: Handle the request**
The response will provide detailed information about the new project created.
**Success Response:**
* **Status Code:** `200 OK`
* **Body:**
```json
{
"message": "added webhook url.",
"status": "success"
}
```
**Troubleshooting**
* `400 Bad Request`: If the `projectId` or `webhookURL` is not in the body.
* `401 Unauthorized`: If the user is unauthorized or the token is missing.
* `500 Internal Server Error`: For errors while adding webhook URL.
# Get Active Agent
This section provides instructions on using the /project/active-agent endpoint to get id of an active agent.
Active agents are set for a project. These are the default agents for a project.
**Step1: Prepare Your Request**
* **Endpoint:** `/project/active-agent`
* **Method:** `POST`
* **URL:** `https://api.talkstackai.com/project/active-agent`
* **Headers:** Include `Content-Type: application/json`.
* **Authorization:** Bearer token or x-api-key in Headers
**Step2: Create the Request Body**
* `projectId`: Id of the project.
```json
{
"projectId": "xxxxxxxxxxxxxxxxxxxxxxxxxxxxxxxxx"
}
```
**Step 3: Send the Request**
Use your preferred HTTP client to send the POST request with the JSON body.
**Step 4: Handle the request**
The response will provide detailed information about the new project created.
**Success Response:**
* **Status Code:** `200 OK`
* **Body:**
```json
{
"message": "added webhook url.",
"status": "success",
"active_agent": "xxxxxxxxxxxxxxxxxx"
}
```
**Troubleshooting**
* `400 Bad Request`: If the `projectId` and `active_agent` are not in the request body.
* `401 Unauthorized`: If the user is unauthorized or the token is missing.
* `404 Not Found`: If no active agent is found for the project
* `500 Internal Server Error`: For errors while getting active agent.
# Set Active Agent
This section provides instructions on using the /project/active-agent endpoint to set active agent for .
**Step1: Prepare Your Request**
* **Endpoint:** `/project/active-agent`
* **Method:** `PATCH`
* **URL:** `https://api.talkstackai.com/project/active-agent`
* **Headers:** Include `Content-Type: application/json`.
* **Authorization:** Bearer token or x-api-key in Headers
**Step2: Create the Request Body**
* `projectId`: Id of the project.
* `active_agent`: Id of the agent you want to set as active.
```json
{
"projectId": "xxxxxxxxxxxxxxxxxxxxxxxxxxxxxxxxx",
"active_agent": "xxxxxxxxxxxxxxxxxxxxxxxxxxxxxxxx"
}
```
**Step 3: Send the Request**
Use your preferred HTTP client to send the PATCH request with the JSON body.
**Step 4: Handle the request**
**Success Response:**
* **Status Code:** `200 OK`
* **Body:**
```json
{
"message": "updated active agent successfully.",
"status": "success",
"project": {
"name": "John Smith Clinic",
"description": projectData.description,
"active_agent": projectData.active_agent,
"created_at": projectData.created_at,
"call_status_webhook": projectData.call_status_webhook,
"user_id": projectData.user_id,
}
}
```
**Troubleshooting**
* `400 Bad Request`: If the `projectId` and `active_agent` are not in the request body.
* `401 Unauthorized`: If the user is unauthorized or the token is missing.
* `500 Internal Server Error`: For errors while setting active agent.
# Remove Active Agent
This section provides instructions on using the /project/active-agent/:agentId endpoint to set active agent for .
**Step1: Prepare Your Request**
* **Endpoint:** `/project/active-agent/:agentId`
* **Method:** `PATCH`
* **URL:** `https://api.talkstackai.com/project/active-agent/:agentId`
* **Headers:** Include `Content-Type: application/json`.
* **Authorization:** Bearer token or x-api-key in Headers
**Step 2: Send the Request**
Use your preferred HTTP client to send the PATCH request.
**Success Response:**
* **Status Code:** `200 OK`
* **Body:**
```
{
"message": "Removed active agent from project successfully.",
"status": "success"
}
```
**Troubleshooting**
* `401 Unauthorized`: If the user is unauthorized or the token is missing.
* `500 Internal Server Error`: For errors while removing active agent.
# Create a new Agent
This section provides instructions for using the /agent/create-agent endpoint to create a new agent.
**Step 1: Prepare Your Request**
* **Endpoint:** `/agent/create-agent`
* **Method:** `POST`
* **URL:** `https://api.talkstackai.com/agent/create-agent`
* **Headers:** Include `Content-Type: application/json`.
* **Authorization:** Bearer token or x-api-key in headers
**Step 2: Create the Request Body**
* `name`: name of the AI Agent to be created.
* `systemInstruction`: instructions to the bot. The AI Agent will use these instructions for calling. For Example: "You are an agent called John. You can take any question related to Chemistry."
* `projectId`: the id of the project for which the agent is to be created.
* `phoneNumber`: phone number to be given to the AI Agent. The AI Agent will use this phone number to make calls.
* `voice_id`: It is the id of the voice with which agent speaks.
```
{
"name": "Jack",
"systemInstruction": "You are an agent called John. You can take any questions related to Mathematics.",
"projectId": "XXXXXXXXXXXXXXXXXXXXXXXXXXX",
"voice_id": "xxxxxxxxxxxxxxxxxxxxxxxx"
}
```
**Step 3: Send the Request**
Use your preferred HTTP client to send the POST request with the JSON body.
**Step 4: Handle the Response**
The response will provide detailed information about the new agent created.
**Troubleshooting**
* `400 Bad Request`: If the projectId, name, systemInstruction, or phoneNumber is missing in the request.
* `500 Internal Server Error`: For errors in creating a new agent.
Last updated 15 hours ago
# Get Agent Details
This section provides instructions on using the /agent/:agentId endpoint to retrieve the details of a particular agent.
**Step 1: Prepare Your Request**
* **Endpoint:** `/agent`
* **Method:** `POST`
* **URL:** `https://api.talkstackai.com/agent`
* **Headers:** Include `Content-Type: application/json`.
* **Authorization:** Bearer token or x-api-key in headers
**Step 2: Create the Request Body**
* `projectId`: The id of the project in which the agent exists.
* `agentId`: The id of the agent whose details you want to fetch.
```
{
"projectId": "XXXXXXXXXXXXXXXXXXXXXXXXX",
"agentId": "ZZZZZZZZZZZZZZZZZZZZZZZZZZZ"
}
```
**Step 3: Send the Request**
Use your preferred HTTP client to send the POST request with the JSON body.
**Step 4: Handle the request**
The response will provide detailed information about the agent requested.
**Success Response:**
* **Status Code:** `200 OK`
* **Body:** The response includes details like name, projectId, systemInstruction, and id.
```
{
"name": "John",
"projectId": "XXXXXXXXXXXXXXXXXXX"
"id": "XXXXXXXXXXXXXXXXXXXXXXXX"
"systemInstruction": "prompt given to bot"
}
```
**Troubleshooting**
* `400 Bad Request`: If the `projectId` or `agentId` is missing in the request.
* `404 Not Found`: If the agent is not found.
* `500 Internal Server Error`: For errors in fetching the agent details.
Last updated 17 hours ago
# Update Agent
This section provides instructions on using /agent endpoint to update agent data
**Step1: Prepare Your Request**
* **Endpoint:** `/agent`
* **Method:** `PUT`
* **URL:** `https://api.talkstackai.com/agent`
* **Headers:** Include `Content-Type: application/json`.
* **Authorization:** Bearer token or x-api-key in headers
**Step2: Create the Request Body**
* `projectId`: The id of the project in which the agent exists.
* `agentId`: The id of the agent whose details you want to update.
* `name`: If you want to update the name of the agent then add this in the request body.
* `systemInstruction`: If you want to update the systemInstruction of the agent then add this in the request body.
```
{
"message": "agent data updated successfully.",
"status": "success",
"data": {
"projectId": "XXXXXXXXXXXXXXXXXXXXXXXXX",
"agentId": "ZZZZZZZZZZZZZZZZZZZZZZZZZZZ",
"name": "Jack",
"systemInstruction": "instructions for the agent",
"voice_id": "xxxxxxxxxxxxxxxxxxxxx"
}
}
```
**Step 3: Send the Request**
Use your preferred HTTP client to send the PUT request with the JSON body.
**Step 4: Handle the request**
The response will provide detailed information about the agent updated.
**Success Response:**
* **Status Code:** `200 OK`
* **Body:** The response includes details like name, projectId, systemInstruction, id, and phoneNumber.
```
{
"systemInstruction": "You are Jack. You can take any questions related to astronomy.",
"name": "Jack",
"projectId": "XXXXXXXXXXXXXXXXXXXXXX",
"agentId": "XXXXXXXXXXXXXXXXXXXXXX",
"voice_id": "EXAVITQu4vr4xnSDxMaL"
}
```
**Troubleshooting**
* `400 Bad Request`: If the `projectId` or `agentId` is missing in the request. Or `name` and `systemInstruction` are missing.
* `404 Not Found`: If the agent is not found.
* `500 Internal Server Error`: For errors in updating the agent details.
Last updated 15 hours ago
# Delete an agent
This section provides instructions on using /agent endpoint to delete agent data
**Step1: Prepare Your Request**
* **Endpoint:** `/agent`
* **Method:** `DELETE`
* **URL:** `https://api.talkstackai.com/agent`
* **Headers:** Include `Content-Type: application/json`.
* **Authorization:** Bearer token or x-api-key in headers
**Step2: Create the Request Body**
* `projectId`: The id of the project in which the agent exists.
* `agentId`: The id of the agent whose details you want to delete.
```
{
"projectId": "XXXXXXXXXXXXXXXXXXXXXXXXX",
"agentId": "ZZZZZZZZZZZZZZZZZZZZZZZZZZZ"
}
```
**Step 3: Send the Request**
Use your preferred HTTP client to send the DELETE request with the JSON body.
**Step 4: Handle the request**
The response will show status of the deletion.
**Success Response:**
* **Status Code:** `200 OK`
* **Body:** The response includes details like name, projectId, systemInstruction, id, and phoneNumber.
```
{
"message": "Agent Deleted",
"status": "success"
}
```
**Troubleshooting**
* `400 Bad Request`: If the `projectId` or `agentId` is missing in the request.
* `404 Not Found`: If the agent is not found.
* `500 Internal Server Error`: For errors in updating the agent details.
Last updated 15 hours ago
# Get All agents
This section provides instructions on using the /agent/:projectId endpoint to fetch a list of all agents in the project.
**Step1: Prepare Your Request**
* **Endpoint:** `/agent/:projectId`
* **Method:** `GET`
* **URL:** `https://api.talkstackai.com/agent/:projectId`
* **Headers:** Include `Content-Type: application/json`.
* **Authorization:** Bearer token or x-api-key in headers
**Step2: Setting Request parameters**
* `projectId`: The id of the project from which you want to fetch a list of agents.
```
{
"projectId": "XXXXXXXXXXXXXXXXXXXXXXXXXXXX"
}
```
**Step 3: Send the Request**
Use your preferred HTTP client to send the GET request with route params.
**Step 4: Handle the request**
The response will show a detailed list of all active agents in the project.
**Success Response:**
* **Status Code:** `200 OK`
* **Body:** The response gives a list of all agents.
```
[
{
"name": "John",
"projectId": "XXXXXXXXXXXXXXXXXXX",
"systemInstruction": "Instructions given to the agent.".
"id": "XXXXXXXXXXXXXXXXXXXXXXXX"
},
{
"name": "Jack",
"projectId": "XXXXXXXXXXXXXXXXXXX",
"systemInstruction": "Instructions given to the agent.".
"id": "XXXXXXXXXXXXXXXXXXXXXXXX"
},
]
```
**Troubleshooting**
* `400 Bad Request`: If the `projectId` is missing in the request.
* `404 Not Found`: If there are no agents.
* `500 Internal Server Error`: For errors in getting the agent list
Last updated 15 hours ago
# Make phone call
This section explains how to use the makeCall endpoint to initiate calls using TalkStack's API.
**Step 1: Prepare Your Request**
* **Endpoint:** `/call/makeCall`
* **Method:** `POST`
* **URL:** `https://calls.talkstack.ai/call/makeCall`
* **Headers:** Include `Content-Type: application/json`.
* **Authorization:** Bearer token or x-api-key in headers
**Step 2: Construct the JSON Body with Dynamic Variables**
* `agentId`: The id of the agent whose details you want to fetch.
* `projectId`: The id of the project with which the agent is associated.
* `number`: The number you want to make the call to.
* `dynamicVariables`: If your prompt has dynamic variables then you need to pass these variables in this object. For e.g.
**Prompt:**
```
You are an agent called {{name}}. You can take any questions relaetd to
```
**Request Body:**
```json
{
"number": "+1XXXXXXXXXX",
"projectId": "XXXXXXXXXXXXXXXXXXXXXXXXXXXXX",
"agentId": "XXXXXXXXXXXXXXXXXXXXXXXXXXXXXXXX",
"dynamicVariables": {
"name": "John"
}
}
```
**Step 3: Send the Request**
Use your preferred HTTP client to send the POST request with the JSON body.
**Step 4: Handle the request**
The response will provide detailed information about the new project created.
**Success Response:**
* **Status Code:** `200 OK`
* **Body:**
```json
{
"message": "call made successfully.",
"status": "success",
"call": {
"call_id": "xxxxxxxxxxxxxxxxxxxxxxxxx",
"to": "+1xxxxxxxxxx",
"from": "+1xxxxxxxxxx"
}
}
```
**Troubleshooting**
* `400 Bad Request`: If the `projectId` or `agentId` or `number` is not in the request body.
* `401 Unauthorized`: If the user is unauthorized or the token is missing.
* `500 Internal Server Error`: For errors while getting active agent.
# Get call data
This section explains how to use the /call endpoint to initiate calls using TalkStack's API.
**Step 1: Prepare Your Request**
* **Endpoint:** `/call`
* **Method:** `POST`
* **URL:** `https://api.talkstackai.com/call`
* **Headers:** Include `Content-Type: application/json`.
* **Authorization:** Bearer token or x-api-key in headers
**Step 2: Construct the JSON Body with Dynamic Variables**
* `sid`: The sid of the call for which you want to fetch details.
* `projectId`: The id of the project with which the call is associated.
**Step 3: Send the Request**
Use your preferred HTTP client to send the POST request with the above JSON body.
**Step 4: Handle the Response**
The response will provide detailed information about the call associated with the `callSid`.
**Success Response:**
* **Status Code:** `200 OK`
* **Body:** The response includes details like status, from, to, date, recordingUrls, and additional call data.
```json
{
"seconds": 23,
"cost": 0.077,
"status": "completed",
"from": "+14152148508",
"to": "+12068091239",
"date": "Tue, 30 Jan 2024 13:39:53 +0000",
"recordingUrls": [
"https://api.twilio.com/2010-04-01/Accounts/xxxxxx/Recordings/xxxxx.mp3"
],
"phoneNumber": "+12068091239",
"callSid": "CA26e39c970fd416515799f5a165718be3",
"partnerId": "partner-id",
"shiftId": "shift-id",
"assignmentId": "assignment-id",
"data": {
"employeeGoToWork": "false",
"reasonOfCancellation": "Please keep in mind that canceling your shift within 12 hours of shift start will negatively impact your ability to see shifts in the future. Are you sure you want to cancel?",
"newDate": ""
}
}
```
* Confirm that the `callSid` is correctly included in the request body.
* Ensure that the `callSid` is valid and corresponds to a call made through your system.
* Contact our support team for further assistance in case of persistent issues or errors.
**Troubleshooting**
* `400 Bad Request`: If the `callSid` is missing in the request.
* `404 Not Found`: If the call details for the provided `callSid` are not found.
* `500 Internal Server Error`: For errors in fetching the call status.
**Error Responses:**
* `ringing` - temporary
* `in-progress` - temporary
* `voicemail` - permanent
* `busy` - permanent
* `silence` - permanent (if there is silence > 6s during the call or voicemail, we close the call)
* `queued` - temporary (our systems still do not trigger the call)
# Get call history
This section provides instructions for using the /call/get-call-history endpoint to retrieve the status and details of a list calls made through our API.
**Step 1: Prepare your request**
* **Endpoint:** `/call/get-call-history`
* **Method:** `POST`
* **URL:** `https://api.talkstackai.com/call/get-call-history`
* **Headers:** Include `Content-Type: application/json`.
* **Authorization:** Bearer token or x-api-key in headers
**Step 2: Create the Request Body**
* `projectId`: id of the project for which you want to fetch the call list.
* `pageSize`(optional): number of logs to be displayed in the call list. If pages is not defined default value, i.e., 20 is used. It is optional and defaults to 20.
```
{
"projectId": "XXXXXXXXXXXXXXXXXXXXXXXXXX",
"pageSize": 20
}
```
**Step 3: Filter using query params**
* `to`: filter the list to include the call made to a specific number.
* `from`: filter the list to include the call made from a specific number.
* `status`: filter the list to include the call with a specific status. The status value will be one of the following: `queued`, `initiated`, `ringing`, `in-progress`, `completed`, `busy`, `failed`, or `no-answer`.
* `startTime`: Only include calls that started on this date. Specify a date as `YYYY-MM-DD` in UTC, for example: `2009-07-06`, to read only calls that started on this date.
* `startTimeBefore`: Only include calls that started on or before midnight of this date. Specify a date as `YYYY-MM-DD` in UTC, for example `2009-07-06`.
* `startTimeAfter`: Only include calls that started on or after midnight of this date. Specify a date as `YYYY-MM-DD` in UTC, for example `2009-07-06`.
* `.endTime`: Only include calls that ended on this date. Specify a date as `YYYY-MM-DD` in UTC, for example `2009-07-06` .
* `endTimeBefore`: Only include calls that ended on or before midnight of this date. Specify a date as `YYYY-MM-DD` in UTC, for example `2009-0-06`.
* `.endTimeAfter`: Only include calls that ended on or after midnight of this date. Specify a date as `YYYY-MM-DD` in UTC, for example `2009-0-06`.
**Step 4: Handle the response**
The response will provide the list of calls associated with projectId and filtered using the query parameters.
**Success Response:**
* **Status Code:** `200 OK`
* **Body:** The response includes details like status, from, to, date, recordingUrls, and additional call data
```
[
{
"annotation": "billingreferencetag1",
"answered_by": "machine_start",
"api_version": "2010-04-01",
"caller_name": "callerid1",
"date_created": "Fri, 18 Oct 2019 17:00:00 +0000",
"date_updated": "Fri, 18 Oct 2019 17:01:00 +0000",
"direction": "outbound-api",
"duration": "4",
"end_time": "Fri, 18 Oct 2019 17:03:00 +0000",
"forwarded_from": "calledvia1",
"from": "+13051416799",
"from_formatted": "(305) 141-6799",
"phone_number_sid": "PNdeadbeefdeadbeefdeadbeefdeadbeef",
"price": "-0.200",
"price_unit": "USD",
"start_time": "Fri, 18 Oct 2019 17:02:00 +0000",
"status": "completed",
"subresource_uris": {
"notifications": "/2010-04-01/Accounts/ACaaaaaaaaaaaaaaaaaaaaaaaaaaaaaaaa/Calls/CAaaaaaaaaaaaaaaaaaaaaaaaaaaaaaaaa/Notifications.json",
"recordings": "/2010-04-01/Accounts/ACaaaaaaaaaaaaaaaaaaaaaaaaaaaaaaaa/Calls/CAaaaaaaaaaaaaaaaaaaaaaaaaaaaaaaaa/Recordings.json",
"payments": "/2010-04-01/Accounts/ACaaaaaaaaaaaaaaaaaaaaaaaaaaaaaaaa/Calls/CAaaaaaaaaaaaaaaaaaaaaaaaaaaaaaaaa/Payments.json",
"events": "/2010-04-01/Accounts/ACaaaaaaaaaaaaaaaaaaaaaaaaaaaaaaaa/Calls/CAaaaaaaaaaaaaaaaaaaaaaaaaaaaaaaaa/Events.json",
"siprec": "/2010-04-01/Accounts/ACaaaaaaaaaaaaaaaaaaaaaaaaaaaaaaaa/Calls/CAaaaaaaaaaaaaaaaaaaaaaaaaaaaaaaaa/Siprec.json",
"streams": "/2010-04-01/Accounts/ACaaaaaaaaaaaaaaaaaaaaaaaaaaaaaaaa/Calls/CAaaaaaaaaaaaaaaaaaaaaaaaaaaaaaaaa/Streams.json",
"transcriptions": "/2010-04-01/Accounts/ACaaaaaaaaaaaaaaaaaaaaaaaaaaaaaaaa/Calls/CAaaaaaaaaaaaaaaaaaaaaaaaaaaaaaaaa/Transcriptions.json",
"user_defined_message_subscriptions": "/2010-04-01/Accounts/ACaaaaaaaaaaaaaaaaaaaaaaaaaaaaaaaa/Calls/CAaaaaaaaaaaaaaaaaaaaaaaaaaaaaaaaa/UserDefinedMessageSubscriptions.json",
"user_defined_messages": "/2010-04-01/Accounts/ACaaaaaaaaaaaaaaaaaaaaaaaaaaaaaaaa/Calls/CAaaaaaaaaaaaaaaaaaaaaaaaaaaaaaaaa/UserDefinedMessages.json"
},
"to": "+13051913581",
"to_formatted": "(305) 191-3581",
"trunk_sid": "TKdeadbeefdeadbeefdeadbeefdeadbeef",
"uri": "/2010-04-01/Accounts/ACaaaaaaaaaaaaaaaaaaaaaaaaaaaaaaaa/Calls/CAaaaaaaaaaaaaaaaaaaaaaaaaaaaaaaaa.json",
"queue_time": "1000"
},
]
```
**Troubleshooting**
* `400 Bad Request`: If the `projectId` is missing in the request.
* `404 Not Found`: If the call list for the provided `projectId` is empty.
* `500 Internal Server Error`: For errors in fetching the call list.
# Get call analysis
Retrieve details of a specific call
Post call analysis that includes information such as sentiment, status, summary, and custom defined data to extract. Available after call ends
We would need these two details to fetch call analysis details: Get Questions and SID
Custom call transcript transformation. You can specify the data output structure from each call from as defined post call analysis data section on the dashboard. Can be empty if nothing is specified.
custom\_analysis\_datastructure
**Step 1: Prepare Your Request**
* **Endpoint:** `/call/analysis`
* **Method:** `POST`
* **URL:** `https://api.talkstackai.com/call`
* **Headers:** Include `Content-Type: application/json`.
* **Authorization:** Bearer token or x-api-key in headers
**Step 2: Construct the JSON Body with Dynamic Variables**
* `sid`: The sid of the call for which you want to fetch details.
* `questions`: The questions that you want answers to based on the call transcript.
* questions is an array of object with each question and the type you want the answer in there
* `type`: It is the type in which you want the answer. It can be **Boolean**, **Text**, **Number** or **Selector.**
* **Boolean** will return answer in **Yes** or **No.** Use it when you only want answers in yes or no. Eg - "Is the user interesting in butying the product?"
* **Text** will return answer in a detailed text format. Use it when you want to know how user responded to a particular question. Eg - "How was the user's experience after using the product?"
* **Number** will return answer in numerical format only. Use this type when you have to extract something a numeric value like 2. Eg - "The number of products user wants."
* In order to use **Selector** type you also have to pass options. Our AI agent will then analyze the call and pass the most viable option out of the given options. Eg - "What is the reason for user to enroll somewhere else?"\
Options: \["User got better offers.", "User is not interested anymore.", "User didn't like the curriculum.", "Unknown reason."]
{
    "sid": "CAe87874170863288f1297a4cde04c1d98",
    "questions": [
        {
            "id": 1742985984755,
            "type": "Boolean",
            "name": "Is the user interested in stars?",
            "options": []
        }
    ]
}
**Step 3: Send the Request**
Use your preferred HTTP client to send the POST request with the above JSON body.
**Step 4: Handle the Response**
The response will provide detailed information about the call associated with the `callSid`.
**Success Response:**
* **Status Code:** `200 OK`
* **Body:** The response includes details like status, from, to, date, recordingUrls, and additional call data.
```
https://api.talkstackai.com/call/{call_id}
```
When the agent has a successful call with the user and the call was complete without being cutoff.
call\_successful
Indicates if call hits voicemail.
call\_invoicemall
High-level call summary.
call\_summary
The reason for the disconnection of the call.
call\_disconnectionreason
Available options:
`user_hangup`,`agent_hangup`,`call_transfer`,`voicemail`,`inactivity`,`maxduration`,`concurrencylimit`,`invalidpayment`,`scamdetected`,dial\_`busy`,`dial_failed`,`dial_no_answer`,`error_twilio`,`error_no_audio_received`,`error_asr`,`error_unknownregistered_call_timeout,error_silent,error_vonage.`
[^1]:
# Call disconnection reasons
Find the Disconnection Reason through Dashboard or get-call API.
Please note that when phone numbers enagage in a lot of short calls in a short period, it might be marked as spam at carrier level, which in turn leads to number being blocked and show up as dial\_failed.
| Disconnection Reason | Description |
| --------------------------- | -------------------------------------------------------------------------------------------------------------------------------------------------- |
| user\_hangup | Expected behavior, user hangup the call. |
| agent\_hangup | Expected behavior, AI agent hangup the call. |
| call\_transfer | Expected behavior, AI agent transferred the call. |
| voicemail\_reached | Expected behavior, if AI agent configured voicemail settings, and reached voicemail. |
| inactivity | Expected behavior, call was terminated due to the “end\_call\_after\_silence\_ms” setting reached after long inactivity. |
| machine\_detected | Expected behavior, call was terminated due to the “drop\_call\_if\_machine\_detected” setting triggering when an voicemail or similar is detected. |
| max\_duration\_reached | Expected behavior, call was terminated due to maximum duration reached. |
| concurrency\_limit\_reached | Error, concurrency limit reached, add a retry with exponential backoff. Or consider enterprise plan. |
| no\_valid\_payment | Error, no valid payment registered on file, or service shut down due to bill overdue. |
| scam\_detected | Error, scam detected for that particular agent. |
| error\_inbound\_webhook | Error, failed to retrieve dynamic variables for inbound phone call. |
| dial\_busy | The number dialed in busy. |
| dial\_failed | Dailing failed, might be due to callee number is non existent, or the agent number is marked as spam and got blocked. |
| dial\_no\_answer | The number dialed did not answer. |
| error\_twilio | Error, Twilio websocket connection between TalkStack server encountered an error. |
| error\_asr | Error, ASR encountered a problem. |
| error\_unspecified | Error, unspecified problem. |
| error\_vonage | Error, Vonage websocket connection between TalkStack server encountered an error. |
| registered\_call\_timeout | Error, phone call is 30s or more apart from registering. |
| | |
| | |
**You have ran out of credit, and have not added payment account.**
To check your credit balance, go to the Dashboard and click on the “Billing” tab. You have been rate limited.
Check Concurrency Guide for more info.
Apart from these common causes, there are other possible causes for this issue for different scenarios.
**Phone Call with Custom Twilio**
There’re a couple possible causes for this issue:
Check if your Twilio account has enough balance to make the call.
Check if your voice webhook for Twilio is correctly set up. You can add logging to see if that’s being called. Check if in voice webhook you returned the correct audio websocket url.
Check if your Register Call API is correctly called and returned the correct response.
Problem During the call
This refers to the broad category of issues that occur during the call, such as:
call dropped during the call
agent not responding
function calling not working
# Batch calls
This section provides instructions for using the /call/batch-call endpoint to retrieve the status and details of a list calls made through our API.
**Step 1: Prepare your request**
* **Endpoint:** `/call/batch-call`
* **Method:** `POST`
* **URL:** `https://api.talkstackai.com/call/batch-call`
* **Headers:** Include `Content-Type: multipart/form-data`.
* **Authorization:** Bearer token or x-api-key in headers
**Step 2: Create the Request Body**
The request body will be **FormData** with three required keys. These keys are `projectId`, `agentId`, and `file`.
* `projectId`: id of the project for which you want to fetch the call list.
* `agentId`: id of the agent which will make the calls.
* `file`: It should either be an excel sheet or csv file. All the numbers listed in this file will be called using the agent provided.
* File should have `number` column. It is where the numbers are you want to make calls to must be.
* You can optionally pass dynamic variables under `dynamicVariables` column
# List Voices
This section explains how to use the `/voices` endpoint to get phone number data using TalkStack's API.
**Step1: Prepare Your Request**
* **Endpoint:** `/voices`
* **Method:** `GET`
* **URL:** `https://api.talkstackai.com/voices`
* **Headers:** Include `Content-Type: application/json`.
* **Authorization:** Bearer token or x-api-key in Headers
**Step 2: Send the Request**
Use your preferred HTTP client to send the GET request.
**Step 3: Handle the request**
The response will provide a detailed list of voices.
**Success Response:**
* **Status Code:** `200 OK`
* **Body:**
```json
{
"message": "successfully fetched voice list.",
"status": "success",
"voices": [
{
"name": "Aria",
"labels": {
"accent": "American",
"description": "expressive",
"age": "middle-aged",
"gender": "female",
"use_case": "social media"
},
"voice_id": "XXXXXXXXXXXXXXXX",
"preview_url": "XXXXXXXXXXXXXXXXXXXXX"
},
{
"name": "Roger",
"labels": {
"accent": "American",
"description": "confident",
"age": "middle-aged",
"gender": "male",
"use_case": "social media"
},
"voice_id": "XXXXXXXXXXXXXXXXXXX",
"preview_url": "XXXXXXXXXXXXXXXXXXXXXXXXXXX"
},
...
]
}
```
**Troubleshooting**
* `401 Unauthorized`: If the user is unauthorized or the token is missing.
* `500 Internal Server Error`: For errors in getting voices list.
# Get Voice data
This section explains how to use the `/voices/:voice_id` endpoint to get phone number data using TalkStack's API.
**Step1: Prepare Your Request**
* **Endpoint:** `/voices/:voice_id`
* **Method:** `GET`
* **URL:** `https://api.talkstackai.com/voices/:voice_id`
* **Headers:** Include `Content-Type: application/json`.
* **Authorization:** Bearer token or x-api-key in Headers
**Step 2: Send the Request**
Use your preferred HTTP client to send the GET request.
**Step 3: Handle the request**
The response will provide details of voice using voice\_id.
**Success Response:**
* **Status Code:** `200 OK`
* **Body:**
```json
{
"message": "successfully fetched voice list.",
"status": "success",
"voice": {
"name": "Aria",
"labels": {
"accent": "American",
"description": "expressive",
"age": "middle-aged",
"gender": "female",
"use_case": "social media"
},
"voice_id": "xxxxxxxxxxxxxxxxxxxx",
"preview_url": "xxxxxxxxxxxxxxxxxxxxxxxxx"
}
}
```
**Troubleshooting**
* `401 Unauthorized`: If the user is unauthorized or the token is missing.
* `500 Internal Server Error`: For errors in getting voices list.
# Get phone number data
This section explains how to use the /phone-number endpoint to get phone number data using TalkStack's API.
**Step 1: Prepare Your Request**
* **Endpoint:** `/phone-number`
* **Method:** `POST`
* **URL:** `https://api.talkstackai.com/phone-number`
* **Headers:** Include `Content-Type: application/json`.
* **Authorization:** Bearer token or x-api-key in headers
**Step 2: Construct Request Body**
You can get phone numbers using phoneNumberId, agentId, and projectId. You can only use one of these in each request if more than one are passed then the precedence order is: \
**phoneNumberId -> agentId -> projectId**
* `phoneNumberId`: This is the ID of the phone number you are inquiring about..
* `agentId`: This is the agent ID linked to the phone number you are inquiring about.
* `projectId`: This is the project ID linked to the phone number(s) you are inquiring about.
**Step 3: Send the Request**
Use your preferred HTTP client to send the POST request with the above JSON body.
**Step 4: Handle the Response**
The response will provide detailed information about the phone number associated with the given identifier.
**Success Response:**
* **Status Code:** `200 OK`
* **Body:**
```
{
"message": "Phone number details fetched successfully.",
"status": "error",
"data": {
"e164": "+14152148508",
"id": "3189fbff-f9fa-4920-b95c-63387b1204a4",
"status": "AVAILABLE",
"projectId": "94f53ecd-ec99-42fc-bc69-e79468550af2",
"agentId": "232ac42a-2ea0-4276-a5d8-43c8c9f7b857"
}
}
```
* Confirm that the `projectId` is correctly included in the request body.
* Ensure that the `agentId` is valid and corresponds to the phone number searched for.
* Contact our support team for further assistance in case of persistent issues or errors.
**Troubleshooting**
* `400 Bad Request`: If the identifier is missing in the request.
* `404 Not Found`: If the phone number is not found.
* `500 Internal Server Error`: For errors in fetching phone number details.
# Assign Number to Agent
This section provides instructions on using /phone-number/add-number endpoint to assign a phone number to agent
**Step 1: Prepare Your Request**
* **Endpoint:** `/phone-number/add-number`
* **Method:** `POST`
* **URL:** `https://api.talkstackai.com/phone-number/add-number`
* **Headers:** Include `Content-Type: application/json`.
* **Authorization:** Bearer token or x-api-key in headers
**Step 2: Create the Request Body**
* `e164`: The number you want to assign to the bot. The number should be verified or purchased from Twilio and should include country code. For eg: +14232324232
* `agentId`: The id of the agent to which you want to assign this number.
* `projectId`: the id of the project with which the agent is associated.
```
{
"message": "PhoneNumber assigned successfully.",
"status": "success"
}
```
**Step 3: Send the Request**
Use your preferred HTTP client to send the POST request with the JSON body.
**Step 4: Handle the Response**
The response will provide detailed information about the new agent created.
**Troubleshooting**
* `400 Bad Request`: If the projectId, name, systemInstruction, or phoneNumber is missing in the request.
* `500 Internal Server Error`: For errors in creating a new agent.
Last updated 15 hours ago
# HubSpot Integration
This page discusses about the native integration of Talkstack AI app in Hubspot
Talkstack AI natively integrates with HubSpot, you don't need any middleware or third party interaction to get Talkstack AI working with HubSpot.
**Getting Started**
* **Prerequisites:** In order to install [Talkstack AI](https://dashboard.talkstack.ai) app in your [HubSpot](https://www.hubspot.com/) account, you need have an account with access to workflows and sequences on [HubSpot](https://dashboard.talkstack.ai/auth/login). For new users it is necessary to create a new account and create at least one project and one agent on [Talkstack AI dashboard](https://dashboard.talkstack.ai/auth/login). A user can create multiple projects and each project can have multiple agents. Before making calls you need to get verified and get a number. For getting a number contact
* **Installation:** Follow these steps to get the [Talkstack AI](https://dashboard.talkstack.ai) app installed in [HubSpot](https://www.hubspot.com/).
* Go to **HubSpot market place** and search for **Talkstack AI** app and then click on install button.
* You will be then redirected to **account selection page.** Select the account in which you want to install the app. After that **permissions page** will be shown. You need to grant these permissions in order to install the app. Review these permissions and then **click on connect button.**
* Finally, you will be redirected to [Talkstack AI dashboard](https://dashboard.talkstack.ai/auth/login) login, into the dashboard and you will be prompted with a snackbar saying "HubSpot integration successful".
* Go to your [HubSpot](https://www.hubspot.com/) account and then click on settings icon > integrations > connected apps. There in connected apps list, you will find the app. If you don't see the app there try refreshing the page. If the issue persists contact .
* **Using Talkstack AI app in Workflows:** [Talkstack AI](https://dashboard.talkstack.ai) app can be used to make calls to contacts from contacts object. The AI agent will interact with the contact and you can even get post call analysis. \
\
Follow these steps to use [Talkstack AI](https://dashboard.talkstack.ai) app in workflows:
* Go to automation > workflows and then either edit an existing workflow or create a new one from scratch. We are going to create a new workflow from scratch here. Click on the button on the top right corner that says Create workflow > From scratch.
* Select the object on which the the workflow is based on, we will be making a contact-based workflow for making calls. So, selecting contact-based workflow. Click on the next button.
* Select trigger for you workflow, and also check re enroll if you want to enroll contacts again and again. Click the "+" icon to add new step in the workflow. From the "Integrated apps" section select Talkstack app and then select the feature like "Make AI Phone Call".
* Fill in the form to make call to the contact. Details like Phone Number, API Key, AgentID and Project ID are required fields. You can use property mapping to put phone numbers dynamically in the form.
* Review and publish the workflow. Enroll contacts in the workflow and you are ready to make calls.
* Further, if you want to use a different prompt for a certain workflow, you can put it in "Agent Prompt" field. This agent prompt will not overwrite the prompt saved via Talkstack dashboard. If you have prompt in dashboard and put one here then this prompt will be used to make calls. If your prompt uses dynamic variables then you can put a json of these variables in the "Dynamic Variables" field. Eg -> \
**Agent Prompt -** You are an agent called Sona. You work in a clinic named {{clinicname}}. You can take any questions related to general health.\
**Dynamic Variables -** {"clinicname": "John Doe's Clinic"}